top of page
MODELING WITH TILING TEXTURES
BUILDING A BASIC STYLIZED ENVIRONMENT
What time is it? Let me check my watch... *All it shows is a picture of an environment.* ...CORRECT!
For this assignment/tutorial, I'm going to loosely guide you through the steps to create a cool stylized environment. Your goal is to imagine you're on the Nintendo B-Team, and you have to build a little bonus island for some weird expanded content in the style of Legend of Zelda: Wind Waker. Unfortunately, your team's main concept artists are busy working on the important main islands, so all your bonus island gets is a quick pass by one of the concept interns, and this is what you've got to work with:

Obviously, this work is nowhere near the quality bar set by the actual Wind Waker game, but let's roll with it anyway just for the fun of some inspiration while learning the modeling process.
All right, cool. And yet, terrifying. Your team is crunching to get the project done, so you're on your own to build this entire environment, and you gotta do it FAST. Where to even start?
Well, you'll eventually come up with a process that works best for you, and we're always changing and getting better, so even these techniques might be outdated soon/already, but I'll guide you through how I would currently approach it, and provide a few tips and strategies along the way.
First, some specs for the assignment:
1. In our imaginary scenario, this bonus island will appear in a brief cutscene where Link finds some bonus content and then some dialogue plays out. It will only be visible from this one camera angle, so don't wast time building the back side or spend time on parts you can't see from the angle shown in the concept.
2. The materials don't need to be cel shaded, but the textures should be hand painted and attempt to fit the Wind Waker style. Obviously we don't have their style guides and studio expertise, so just getting in a ballpark is enough for now. Surface textures should have subtle patterns that respect good design using big, medium, and small shapes according to the patterns.
3. Avoid straight and flat edges. Shapes should be given the "puff-n-funk" treatment: either make it puffy or wiggly and varied.
4. Poly budget is 100k, meaning don't worry about poly count.
STAGE 1: BLOCKING IN
The very first step that you'll almost always need when building an environment is some way to figure out the actual 3D space. I know some people who can just dive straight into modeling, and they're just okay starting off in a wrong direction and throwing away tons of work as they discover problems and remake it until it becomes great. While that's a totally legitimate way to work, and it can be a fast and effective practice, plus you get bonus points for calling your workflow "iterative," it just drives me absolutely insane. I need a technique that lets me work in highly-adaptable guided stages, so I not only can have some sort of confidence that I'm not wasting my time, but also if someone asks me to make major changes, I'm ready and able to do that at any point without wanting to form a makeshift noose out of my ethernet cable.
In most cases you will have to model at least some areas behind or beyond what you can see in the concept, so you'll have to quickly find a way to test and prove that your understanding of the concept will work in actual 3D space and that it will end up proportionally accurate and to scale.
One way to do this is to start with a block-in, also called a graybox model. This is a simple, untextured rough approximation to explore how the scene elements fit in space. In 3ds Max, you can create primitives, convert them to Editable Poly, and then adjust the meshes by hand. The point of working as fast and as simple as possible is to be able to rapidly make changes, ideally at the speed of thought: You think it, you try it. Of course, it will probably never get THAT fast, but if you ever pick a technique that's too slow, you'll really wish you could make changes faster.
Am I still writing the intro to the block-in section!? Goodness, this is the 4th paragraph!! Okay, let's get to work. For this example, I just used boxes, planes, and oil tank primitives (oil tanks are under the Extended Primitives, instead of Standard Primitives). After converting them to Editable Poly, I could add edge loops and use Soft Selection to mush the shapes around into a decent design. I built this entire graybox model in about 6 minutes. I'm not worried about any details yet; just getting a plan for how the forms look and fit together in 3D space. If I put maybe another 15-20 minutes into it, I could get to an appealing layout that matches the concept and gives me a great reference map to know where to build pieces of my final model.

If you want to take the block-in a little farther in very little time, you can export this super lame geometry into ZBrush, dynamesh all the pieces together (keep the dynamesh resolution as low as you can get away with! High detail will definitely come back to bite you at this stage, both artistically and technically), and then use the Move, Clay Buildup, and Insert Cube brushes to quickly modify and add new shapes. It helped me get some ideas for the beach and rocks. It took only 10 minutes to bounce this model through ZBrush, get some good answers, and bring it back into Max.

Tip: The holes on the beach are because I used a plane, and Dynamesh hates planes. It would have been smarter to use a box instead. But, since this mesh is just a layout guide, a mesh full of holes serves its purpose just the same!
Also, this is a great time to take a screenshot and do a paintover in Photoshop, to stretch and warp the shapes and paint in some new ideas to see if you can find a way to improve the model. It's also a good time to show your art lead or the original concept artist what you're doing, to confirm that the space is being interpreted the way they intended for the cameras and scene action. If they have any ideas, you can make the changes in seconds or minutes with almost no lost work.
Okay, with that done, it's now time for some scene management in Max. You'll want to be able to quickly show and hide this block-in mesh while you model over top of it, so a quick way to do that is to use Layers. In the top bar, the button looks like a stack of papers:


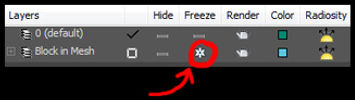
If you select your block-in mesh and click the Create New Layer (Containing Selected Objects) button in the top left, it will make a layer containing your mesh. Rename it to something useful. You now can hide or freeze that layer, as well as right-click on the layer to edit the Object Properties for all the objects in that layer at once.
Quickly mouse over each of the buttons at the top next to the Create button to see what each of them do. They're really useful, but you can figure them out on your own by reading the tooltips
MEGA WARNING: See how the check mark has moved to a new layer? That's bad! Immediately move it back to the default layer. The check mark indicates which layer new objects will go into as you create them. It can be a useful feature, but it can also be a confusing headache trying to figure out what's going on when everything you create is immediately frozen or hidden and you can't interact with it. If that happens, check to make sure they're not being created in a hidden layer.
With your layers ready, Freeze the Block in layer. This
will make it so you can't select it in the viewport.

One more thing to set up in the layers: Right-click the
block-in layer and go to Object Properties. Enable
See-Through and click OK.
This way you'll be able to see through the mesh so you can model the final geometry over it.
And just to clarify, the block-in mesh will be completely thrown away in the end. Just like when high-poly modeling for baking, you can hack the dirtiest geometry together, and as long as it looks the way you want, it's good. Just look at all the junk going on beneath the surface of mine here!

...Okay, actually that's really pathetic. Where did those bottom shapes even come from? I never modeled those... I should at least clean up a few of those polys.
A block-in can be useful for many other purposes as well. In an actual work environment, the game designers might give you a graybox model that they used for testing, and you might have a library of helpful props you can import for things like the size of the character, how far and high the player can jump, how far your hookshot can travel, and all sorts of helpful measurements you can use to block in a great starting point.
With our frozen and semi-transparent 3D road map, we're now ready to begin modeling!
STAGE 2: PLANNING TEXTURES
Since we already have our block-in and space figured out, I find it usually saves time to texture the model as I build it. That way if we can re-use finished pieces without having to unwrap the duplicates again, which really saves time when making dozens of little props that all need to align with specific parts of the texture maps. Also, if I have the final textures in place, I can make cuts into the geometry that match details in the texture.
In order to texture as we go, we'll need to have some textures ready. We don't need to have all our textures finished before we start, but it's a good idea to at least plan them out.
There are three main types of tiling to think about when planning your environment textures:
1. Underlying Surfaces. These are textures that tile
in all directions, and you can use them to cover
large areas.
2. Trim Textures. These are textures that tile in only
one direction, so you can pack a bunch of them into
one sheet. This is great for edging and borders that
cover up hard seams in the underlying surface
textures, as well as for chains, ropes, and thin objects
that run long distances.
3. Details. These are pieces that don't tile at all. They're often assets
with their own unique UV layout for baking normal maps and
textures. They also are often combined in the trim texture sheets,
with some parts being able to tile in one direction, and the other
parts as unique details for specific pieces.
If you combine trim and details, remember that they will be combined into a single material in Unreal or whatever engine you're using. So don't put your grass and leaf textures on the same page as your rocks, because if you want to use special two-sided effects and subsurface shading on the leaves, the rocks will take on those same attributes as well.


Let's take a look at our concept again and see what textures we will need.
Let's start by thinking about the underlying surfaces. Obviously we'll need a sand texture and a grass texture. And I think I'll want two rock textures: one smooth and one for the cliffsides.

Now for trim textures. There would normally be some kind of rock trim, but I plan to hide most of the rock edges by simply placing clusters of smaller rocks, which will use the smooth tiling rock texture. But we'll need a texture for the grass edging, where it sticks up and where it falls down over the sides a bit to break up the line between the cliff and the grass textures. We can probably combine this with some grass detail clumps to get a nice variety of grass that all uses the same texture sheet. The last trim texture I can think of at the moment is one for the waterline band going around the edge of the island.
Other than the grass clumps I'll put with the grass trim texture, I don't see any specific details for this environment. I'll worry about the sky and clouds later. We could ZBrush the statue on top of the island, but for starters we'll make that from the tiling rock texture as well.
So, here's the basic plan for our textures. I like to sketch them out as thumbnails just to get a quick idea and briefly think through the surface patterns and trim placement:

The grass trim texture can use an opacity map, or you can simply cut out the grass shapes individually with geometry. It will take a few more polys per grass blade, but it will be a cheaper shader without an opacity map, so it will end up being pretty equal either way. For this example, I'm going to skip the opacity map and just cut around the shapes in Max.
STAGE 3: MAKING TEXTURES
With our textures planned, let's actually make them! Remember, we're working on a stylized environment, so use a hard brush and focus on patterns to make the surfaces interesting, instead of using photo overlays like we do for realistic props.
Keep good design in mind: balance the patterns with big, medium, and small shapes. When drawing lines, make some of them big, some small, and some varied from big to small. Place some shapes close together, and some farther apart. Make the shapes themselves big, medium, and small. Pick colors within range, but try to find a way to add appealing variation even into the colors you choose. And keep the shapes puffy and funky!
As a technical reminder, never paint on the edge of a texture. Always paint in the middle, and use the Offset filter to move the canvas and keep painting the middle area. This will avoid seams and designs that won't tile. For trim textures, only offset it in the direction you want the texture to tile.
For this simple environment, let's keep the textures at 512x512.
And that's pretty much it! Go make them texturees! We'll continue with the next step when you have those 6 basic textures finished.
STAGE 4: MODEL THE UNDERLYING SURFACES
At this point I'm gonna stop modeling along with you and just draw what I'm talking about, because I kind of have to hurry up and finish this or my koala roommate will start complaining that I don't spend enough time with him.
In Max, set up your textures in the Material Editor. Be sure to name each material. Unreal is like wicked smartz so you don't need to use a multi sub-object material or anything special. Just make the textures and use them where you want them.
To begin modeling, we want to focus on the most basic underlying surfaces in the scene. Think like you're making a level in Super Mario 64. Nothing fancy, just make Editable Poly surfaces, assign textures to either the whole object or to a polygon selection, and have a UVW Map modifier placed on top.
UVW Map modifier tips: A great starting point is to use the Box setting, and make sure the height, width, and length are all the same. If you have the modifier above the Editable Poly, any changes you make to the geometry will automatically be textured at least fairly well. The Cylindrical, Planar, and Spherical projections are also useful in certain cases. If any seams prove to be a huge problem, you can always use an Unwrap UVW modifier on any polygon selection to unwrap just those polygons by hand or with the Quick Peel tool, and the other parts will remain unaffected.
Model using as many pieces as possible. You can have separate elements within one Editable Poly, or separate objects, but it is almost never an advantage to make the whole environment as one connected mesh. For this island, my underlying geometry would be made from about 7 block pieces. I would assign the cliff texture to the main objects, and then select just the top polygons and assign the grass material to them.

You can (and should) continue to refine the shapes all through the modeling process, but now is a good time to make some changes. Hide your block-in layer and make your surfaces a little more interesting. Add some edge loops to smooth things out, and bevel the sharp corners that won't be hidden by trim geometry. Feel totally free to use the cut tool to slash in new details, or add new pieces, or cut and extrude some existing pieces to create little overhangs and cool stuff.

If you can get this base model looking solid, everything else is only going to make it stronger. And at the same time, this geometry is so dirt-simple. If someone would ask you to make some changes, you can do that in no time! And since you're actually building textured final geometry, the process can be pretty fun and rewarding at this point. Always keep your block-in geometry as a guide, but remember: the block-in is there to serve the model you're building right now. Don't let it stop you from going a new direction that works better.
STAGE 5: HIDE EDGES WITH TRIM
Use your trim and detail textures to create new geometry to either break up or hide the places where you currently have harsh straight edges between objects and between textures.
Tip: I find it pretty time-consuming to model things and then unwrap them to the trim texture. Instead, a quicker way is to just create a square plane (only 1 length and width segment), and assign the trim or detail texture to it. Convert to Editable Poly, then use the cut tool to cut out the shape, and use that as a base for whatever you want to model.

Oh, one quick caution: after you cut out the details, go through and try to cut or connect between the verts to make it all tris and quads. When you bend it, Max will start to have trouble with overly-complex polygons.

Another sneaky trick to save time is a little check box called "Preserve UV's." If you turn it on, then when you make changes to your geometry, Max will try to move the UV's in the same way. For example, here is what it looks like if you just move out some verts normally. The texture gets stretched:

But check out what happens when we have Preserve UV's enabled. As we slide the vertices, new texture is revealed as we go, so we can extend this out to be as long as we want.

Afterward you'll want to turn Preserve UV's back off. I can't tell you how many times I've left it on, forgot about it, and came back to bend the geometry around a rock or a barrel, and zoomed out to realize everything is completely messed up because Max has been moving my UVs everywhere.
So, with all that in mind, let's apply it to our model! Take the grass blades and place them around the scene to hide the grass edges. Try to bend the shapes up and down a little to give them some thickness if viewed from the side:

So keep on going that way. Make the grass edging for the clifftops, and place the water bands around where the island goes into the water. Also make three different rocks: a big one, a medium one, and a small one. Then duplicate them around the beach to hide the seam between the cliff and the sand.

STAGE 6: USE DETAILS TO BREAK REPETITION
A couple issues arise at this point. First, everything is made from generic tiling textures. Perfect; that's the point of this tutorial! But it still can get really repetitive, especially on larger environments. You can help break up noticeable repetition by blending between tiling textures (which I won't cover here), or you can simply cover it up with detail textures, or by actually cutting into the big surface areas to break them up and add variation.
The second issue is that, while your island should be looking pretty nice at this point, there's nothing eye-catching about it yet. If someone were to describe this island to a friend, could they do it in only a few words? Right now, it would be really hard for a kid to describe. "Uh, it's a small island, with like a couple grass bumps and then one big bump, and there's a beach." Nobody's going to remember that. It's much more memorable if we add some props to give it some distinction. For example, "It's the island with the mailbox and a tombstone on top" is an easier read, and it's much more fun and sparks a little imagination from the viewer! Don't hesitate to make a few new textures if a new idea requires them. If you don't need a whole texture sheet, you can always combine pieces or just make a smaller 256x256 texture sheet.
So add them in! It doesn't need to be a mailbox and a tombstone. You can make your own things too! Just keep it simple. Don't overcomplicate the scene so the viewer has to be like, "Well, it's the island with the tombstone, and the mailbox, and the statue, and the bird feeder, and three trees and a goat and some blankets over the goat." Keep it easy, keep it simple and clear and fun. And don't ever shy away from telling a silly story! Maybe someone died on this island, but their ghost wants to keep sending mail? If you just hint at it through the environment, players will often imagine a much funnier and more appealing story than we intended anyway!
And remember to make things puffy and funky!!

By the way, if you want to throw in some preview lighting now, try using two Omni Lights. Make one a light yellow/orange for the sun. Place it up where the sun would be shining from, and turn on Shadows. And for the other light, it can be placed anywhere in the scene. Open the Advanced Effects rollout and enable Ambient Only. Then open the Intensity/Color/Attenuation tab and turn the Intensity down to about 0.6. You'll have to play with the values and colors a little to get the look you want, but this will give you a nice even cartoony lighting to work from.
Once you're happy with your environment and textures, it's time to fill in the rest of the environment. You can probably use a little section of your ocean trim texture to color the whole ocean surface. (Be sure the ocean plane is placed slightly below the waterline trim bands you've created) And make a new trim/detail texture for the clouds and sky. Since the sky is just a simple gradient, you can either make a new 128x128 texture for that, or you can add a little gradient detail on the clouds sheet and place all your sky dome UVs into that area. You'll figure out a way!

STAGE 7: DECORATE THE HECK OUT OF IT!
You've already been doing this a little bit, but keep going! There are no limits to what you can do to push the concept farther. Some good questions to ask are, "If this was my house, what would I dream to do with it?," or, "If I was the person who lives here, what would I expect to see and smell and hear on an average day? What about on a special day?"
Those questions definitely get my imagination going. I might put some mail flapping out of the mailbox, and some letters floating in the water. Maybe a bird would be perched on the tombstone. Would it be a seagull, or a raven? The ghost who lives there would probably decorate his house with some stuff that washed onto the beach. Or maybe he uses mail-order catalogues to get really nice stuff! All kinds of ideas can inform little supporting props. But as mentioned before, don't let the ideas get confusing, and don't let any decorations take the place of the key identifying landmarks of your island. If they're actually cooler than the landmark of the island, then get rid of the landmark and make the cool decoration the landmark. Don't be afraid to cut some losses and delete a cool thing if it's competing with the design. Or better yet, export it to an Unused Assets folder and use it on a prop later on!

The ghost is pretty obviously pushing it too far outside the Legend of Zelda style, and the wind is blowing the mail off-screen so they lead the eye to the right and make me feel irritated that I can't turn the camera a little to see if there's more letters in the water over there. That's not good! So I would probably remove those elements, or maybe arrange them differently to make a better read.
STAGE 8: BRING IT INTO THE ENGINE
In our case, we're using Unreal 4, but no matter which engine you're using, you'll need to bring your environment in to set up the final look of the scene in its presentation context. It's of no benefit if you get it looking perfect in Max, but then it looks all wrong in the game!
The process for Unreal 4 is surprisingly simple. Just select all your meshes, Export Selected, and save them as an FBX file. Import that into Unreal, and include textures and materials.
Once it's in Unreal, you can still work on it in Max, and in fact you'll need to in most cases. Get used to keeping the file open in Max in the background while you work in Unreal. A word of caution though: since the default import created textures and materials, it will do it again if you right-click on the object to Re-import it. This will wipe out all your materials and replace them with new ones. To get around this, don't right-click on the existing asset, but instead import into an empty area of the content browser, or click the import button, and select the same FBX file. It will ask if you want to replace the existing prop, but this time it will give you the import options again, and you can disable textures and materials. If you add a new material in Max, you'll have to reassign them in Unreal, but at least you won't have to set up all your materials again. It's especially important for my workflow, since I only use the diffuse maps for preview in Max, so if they get reset I lose the spec, metallic, normal, and other maps I had set up in Unreal. For a whole environment, that can cost a lot of time!
Some tips for setting your scene up in Unreal:
- Your grass trim material will most likely need to be set to 2-Sided, or else any grass blades facing the other way will be invisible.
- Unreal doesn't have an Ambient Light like in Max, but you can use a Sky Light with the setting disabled to make the bottom half black. You can tint this light and change the intensity to be whatever you like.
- If you place a Post-Process Volume in your scene and find the setting for "Unbound," you can control all sorts of cool things like lens effects, color correction, camera settings, and depth of field. If nothing else, you can at least lock the exposure so the scene doesn't change brightness on you all the time.
I have to mention one quick caviat to this process. For simplicity, everything in my scene is made of unique polygon data in Max, but that will all need to be loaded into memory when playing the game. It's often better to create assets and place them as instances in Unreal. You could take some of your detail meshes (the 3 rocks would be a perfect example), and leave those out when you export the model from Max. Then import each rock or mesh individually in Unreal, and place them in the Unreal editor. It will produce the same effect--you'll still be placing the rocks around the scene--except now only 1 of each rock will need to be loaded into memory, and each mesh will be an instance of that one object. Especially on larger scenes, this becomes an absolutely essential way to work, so I wanted to at least mention that it's not always best just to model everything completely in Max.
So there you have it. Although this project was an introduction, and I intentionally chose a stylized environment to simplify the textures and lighting, the same concepts apply when making all kinds of environments. No matter how difficult or impressive an environment looks, the texturing technique can almost always be boiled down to surface, trim, and details.
For more advance projects, you can explore the full range of PBR texture maps, scene lighting, fully-explorable levels, and sculpting tiling textures in ZBrush! There's much fun to be had, and many worlds to be explored! Good luck, and have fun!
bottom of page